Hi friends, Demi here.
On my first day of sewing I woke up and decided that I wanted to make my own clothing, my next step was to wander around JoAnn's aimlessly with no clue what to do or where to go. I grabbed a pattern and some fabric and headed home not knowing what I would find. I hope after reading this your first day will be different because I will give you a peek into what comes in a prepackaged sewing pattern. I chose the pattern that I am sewing up for my FF dress to show you how to read it and get you sewing!
Okay so here is what the pattern looks like when you bring it home and open it:
The envelope has a picture of the dresses normally just the front views. There are the instructions printed on newspaper-like paper and the tan paper is tissue all of the pattern pieces that you will need to make everything on the cover of the envelope is printed on here.
This is the back:
There is a lot of information on here that you will need to pay attention to. It may seem like a lot to handle but once you know your size, it's so easy to read. Plus, you only need the left half of the scary text because the other half of it is in French! Oui, bon!
This picture is from the Simplicity website so that you can really read all the text, apparently I'm not steady enough to take a picture where all the text is in focus, sigh.
Anywho, the first line tells what the pattern inside is, this is a dress in two lengths with bodice variations. The next section lists what fabric they suggest to work with. You don't HAVE to use these but they will make your dress look more like the pictured dresses. The next section is what will be needed that is not fabric, these are called notions and with this dress just a 22'' zipper is called for. The next section is the pattern sizes offered in the envelope. Check out the Simplicity website to see how to calculate your size. I also like to look at the very bottom section to help me pick my size because it will have the finished garment measurements which is the measurement of the dress once it is finished. Pay close attention to the bust measurement, this will tell you how the top will fit.
Once you have found your size you have to pick which dress to make. Each dress has letters that correspond to each style variation and with that letter the next section will tell you how much fabric you need. It is calculated based on the width of the fabric used. Most fabrics come in either 45 inch or 60 inch widths. I'm making view E in a size 12 and this says I will need 2 and 5/8 yards of 45" fabric for the dress and 1/4 yard for the lining so I bought 3 yards. Interfacing is also needed for this dress it's normally snuck in under the fabric requirement and I forget it so I normally buy that a couple yards at a time so that I can have that on hand. That's it for the back, easy right?
Now let's look at the instructions and the pattern pieces. Here on the front of the instructions you see each view with their assigned letter in a simple illustration. I like to look at these to really get a grasp on what the dress will look like, the front can be deceptive. On the opposite page, there are the shapes of each pattern piece in the envelope:
Each piece has a name and a number attached to it. Find how many pieces you will need and take note of the numbers. For view E, I will be cutting numbers 3, 4, 8, 9, 10, 11, 12, 13, 14, 15, and 16. I normally don't cut the pieces until I use them to save some time.
When you carefully open up the tissue all of the pieces we saw in the instructions will be laid out on one or two pieces of tissue. It's almost like a little scavenger hunt to find the ones you need to cut out.
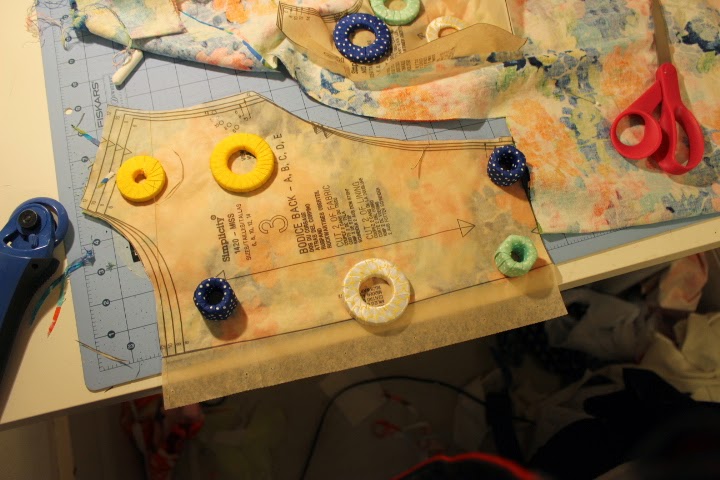
Here is the bodice (or the top of the dress) side front, I need this for view E so I'll cut it out.
The pattern piece has a lot of useful information on it as well. The brand and the pattern number, then the sizes, what the piece is for and what dress views use this piece. Then it tells you how many of that piece to cut out, this one needs two pieces cut from the fabric and two from the lining. You'll also see the finished garment measurements here too which are separated by size. some patterns don't include it on the back but it is almost always on a bodice piece inside.
When we get a little closer you can see there are dots and triangles, these are for reference later when the pattern piece is gone. The dots should be marked, I use chalk. The triangles should be cut out, I cut a small line at the highest point.
Now it's time to cut all of those babies out! Find the size needed and the cutting line you should follow and go for it!
I suggest putting a TV show on and getting comfy, it takes a few minutes to find each piece and you'll want to take your time around the curves. After about one "Bob's Burgers" I have all the pieces needed and the pattern is cut out!
Next time, I will lay the pattern pieces out and cut them out of fabric, but until then I will make sure to wash my fabric, I've learned the hard way on that lesson.
See you Friday,
❤